Unbelievably, I successfully attached the tracks
to my North Irish Horse Sherman earlier this week. In the process I managed to
knock off some of the track teeth and bust a few bits and pieces no serious
damage thought. In case anyone doesn't believe me here are a couple of
pictures to prove it !
These days 1/35 scale tracks offer a
quandary does one opt for the nice and simple rubber band type or the more sophisticated
individual link types? Naturally enough I have chosen the complex and the, more convoluted optionin the form of Bronco workable plastic tracks.
When I got them I was a bit overwhelmed
by the five tiny pieces that makes up each link. Nevertheless, these are robust
and well designed, they go together with minimal fuss. There are no
ejection marks to worry about and are not too fiddly to put together
Before the cement dries it is possible to
manipulate the track section in to place and then put to one side for painting.
At the pace I work. It is a slow process.
I managed to complete both side over a few evenings in front of the telly
and a couple of Saturday afternoons. The end result is that I am left with
a great looking representation of Sherman T54E1 tracks all ready for a lick of paint. I’d better find my airbrush now!
Of
late I have been ignoring my Sherman
and the wider project of completing the crew and the tracks.
While
I would love to make yet more excesses for my tardiness. I can only blame
distractions of work, writing projects and the onset of the Six Nations rugby.
In reality I have simply lost my modelling mojo in this project. I am not
concerned and am sure it will return in due course. I simply must not start any
further projects until this one is completed.
So here are a couple further progress
shots of my North Irish Horse for you to feast your eyes on.
I
have been plodding along at a snails pace with my North Irish Horse Sherman
project. Although progress is slow I am pleased with the outcome so far.
In the weeks building up to Christmas an added a couple more oil washes.
These are to reflect grime and dirt. This was followed by a heavy acrylic
wash with sand represent large deposits of light dirt and dust over the super
structure. Before each of these stages it dappled contact points on the
hull and turret with olive drab where the dirt was rubbed off through contact.
Naturally
enough I have managed to knock off a number of bit in this process.
Nevertheless, the next stage is to bring together all the individual elements.
The turret, hull, stowage and hatches etc and bring it all together with
some beach sand pigment and take the opportunity to tidy up areas which need
work.
Tardiness
would best sum up my attitude to blog writing over the last month or so.
Nevertheless, you can read some of my recent blog contributions on pigeons I
penned in a professional capacity. So let's take the opportunity to give
you a quick update of my North Irish Horse Sherman. It this point it think the
filter washes are more or less complete. They offer a nice mix of grim and dirt
that has built up over time while in theatre.
Another reason for the long delay in progress was
fear. For the next stage I want to add quite heavy weathering with light
shades of sand so -I am concerned about messing it up.
It terms of reference for the next stage I
will use Mario Eens article on building and weathering a DAK Panzer I. From
Military ModellingIssue 3 Volume 40
I promise to post some up dates know matter
how horrific the result.
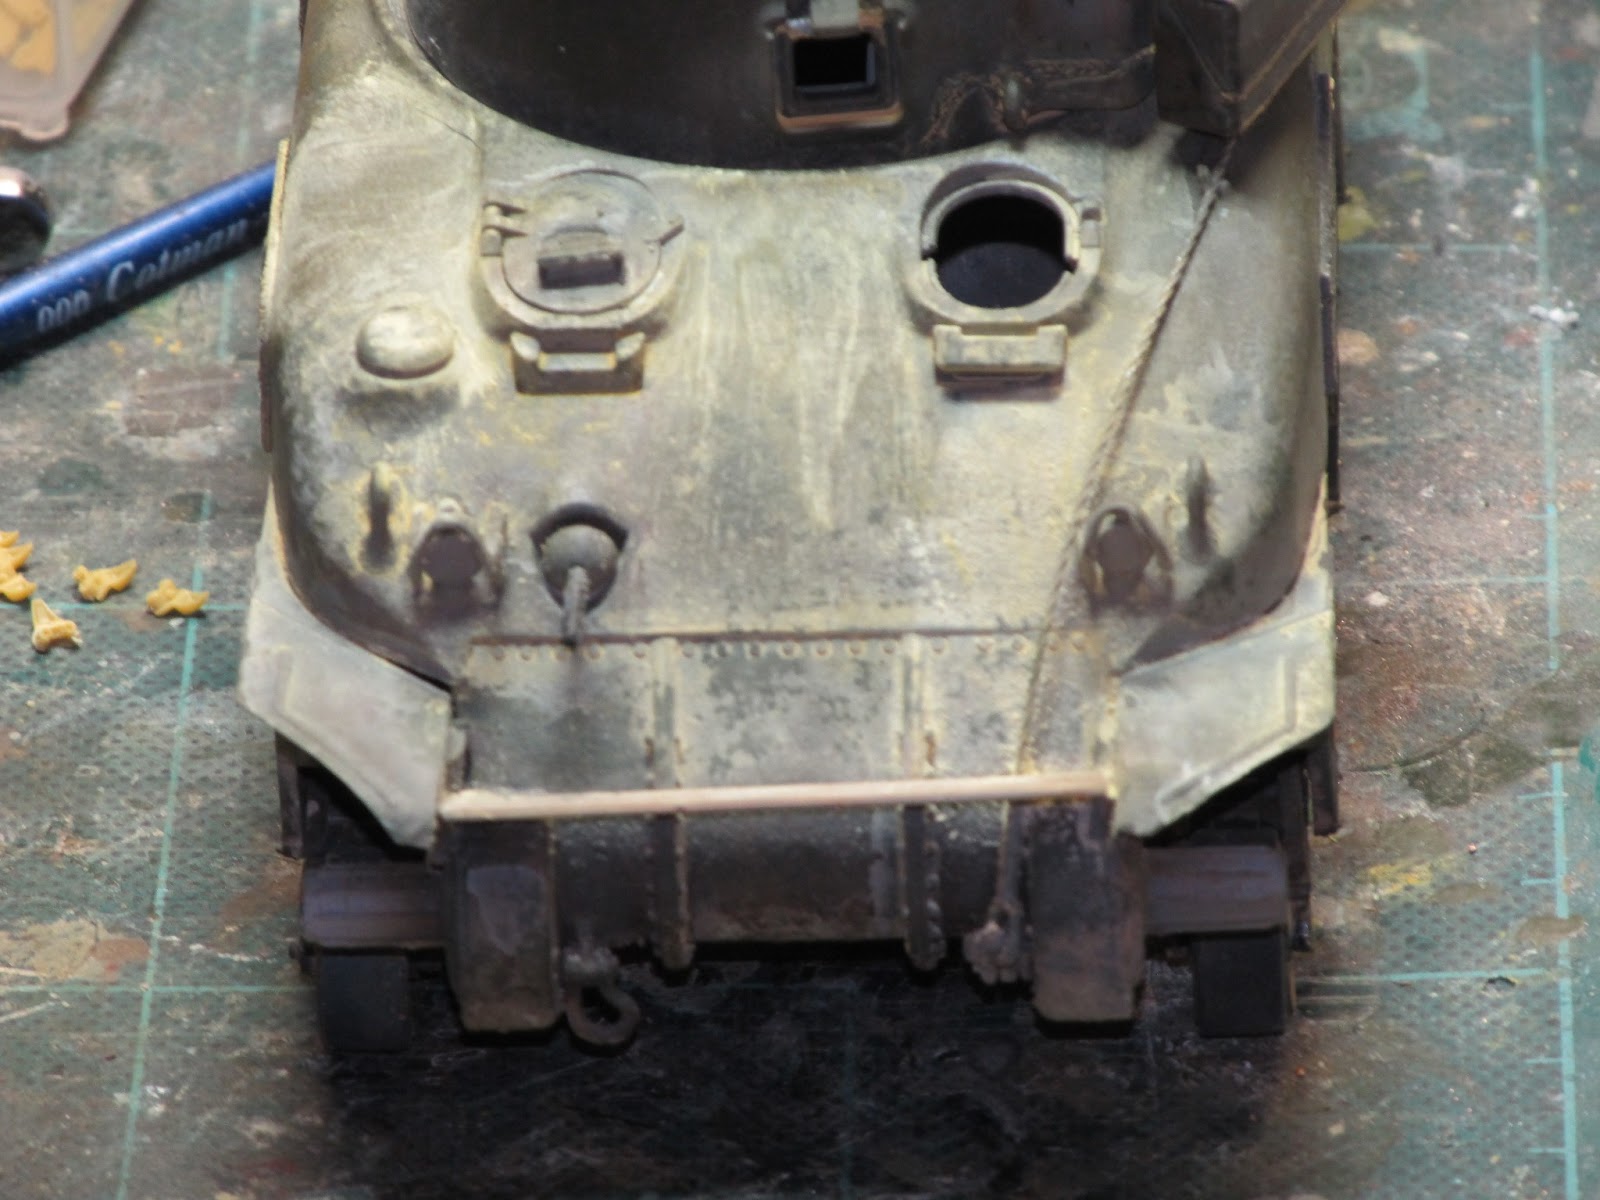
Well with the completion of most of the details on the tank
I got on with the task of making it dirty. Much of the photographic evidence of
tank on campaign in Italy
shows them appearing very dusty and dirty. I wanted to replicate that look on
this vehicle. Starting with the running gear and lower hull I got to work using
a three stage process. The first was to make a damp mud mix which consisted of MIG
liquid resin and European Earth pigment mixed with plaster dust. This was liberally
slapped on to the bottom and sides of the tank, once dry it kept its satin
sheen.
The
next stage was to add dried mud on top of the wet mud. For this I took
direction from one of Scale Model Medic YouTube tutorial uploads.
For his stage I used, mixing European Earth pigment and PVA
glue and dabbed it on to represent dried
on mud building up on the hull sides behind
the running gear as per the tutorial. In
addition the running gear was given a heavy wash of a European Earth and water.
Once this dried I started stripping back the dirt. This is still a work in
progress and need a bit of fine tuning.
The next stage involved giving a liberal brushing of Light
Sand pigment which was fixed with pigment fixing fluid
The final stage so far was to give the upper surfaces a general
dusting with the airbrush using Tamiya Buff to represent a dusty coating.
Well its so far so good, I want to thank the members of the
Military Modelling Forum for their advise to date.
So here is the next update for the North Irish Horse Sherman with a lick of paint.
I started with a little pre-shading using Tamiya Nato Black.
This was followed by a general over spray with Tamiya Olive Drab. Once I was finished I added a little Tamiya Green Yellow to the Olive Drab, about a 30:70 ratio and over sprayed the upper surfaces.
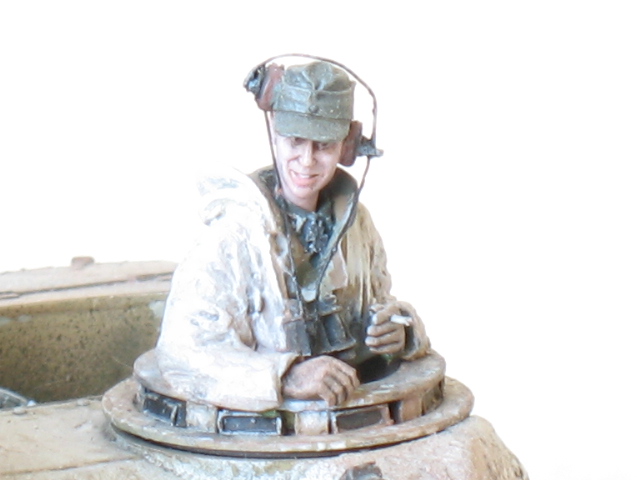
When I started this blog back in 2009 I envisaged it as a quick
reference source for web pages that I may want to refer back to in the future,
a kind of online "Delicious" with a touch of context. In the subsequent time it has developed in to
something more. Nevertheless, when I
examine the traffic statistics for the blog the most popular post by a long strech is the one entitled “Mark Bannerman”. It was my second post of April 2009
linking to an number of online articles Bannerman wrote on using oil paints to
paint 1/35th scale heads.
His face painting technique is a real god send for me and
raised the level of my head painting skills beyond my natural ability. For this
I am eternally to him. So in the interest of responding to the trend of the Blogger
statisticsI felt it would be an opportune
moment to remark on a thread which is currently active the Military Modelling website entitled: “Painting 1/35 Scale Heads Using Oil Paints:” Attempting"The Bannerman Way”. This thread has been going some and has a great selection
of heads by some very talented modellers.
In the meantime here are some examples of my heads painted
the “Bannerman Way.”