Showing posts with label WWII. Show all posts

Sunday, 8 June 2025

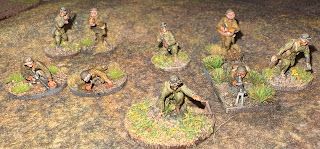
French Motorcycle Reconnaissance Fusilier Platoon: Chain of Command

In preparation for learning Chain of Command 2 I am going to play the “Many Rivers to Cross” Pint-Size Campaign, from the 2018 edition of Lard Magazine. This is always a good opportunity to put a campaign force list together.


Senior and Junior Leaders. 

For the longest time I have been taken with the look and the uniforms of the French Reconnaissance Motorcycle Platoon. It has always struck me has one of the most practicable uniforms of the Early War period.  Most of the miniatures come from Early War Minaitures & TQD Castings. With the release of Chain of Command 2 it a great opportunity to get them back on the table as a defending platoon in a Pint-Size Campaign.

1re Groupe de Fusiliers

2eme Groupe de Fusiliers 


According to the Blitzkrieg Handbook this platoon is potent in terms of firepower with two LMGs per Groupe eight Fusiliers. However they only have two Groupede Fusiliers and the V-B Team. Which  makes them smaller than the standard three Groupe French Platoon.


V-B Team with two Senior Leaders

Since this is one of the few French formations which benefit with two Senior Leaders the  The Support points difference  may give the opportunity to add an additional Groupe the Combat with a Junior Leader From List 5 to beef it up and act as a  mobile reserve. 


Some of the Support Options for the French Early War force:  


Support Option: Groupe de Combat

Support Option: 60mm Brandt Mortar Team with Junior Leader.  

Support Option: Hotchkiss M1914 MMG Team with five crew.


Support Option: Sniper Team.


Support Option: Engineer Team.


 The Beginings of a 'Groupe Franc' Sizaine.

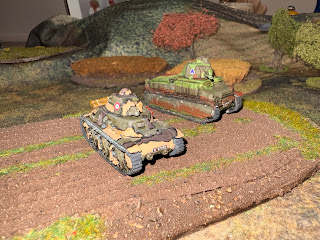
Support Option: A Hotchkiss H35 & Somua S35.
.
 

Thursday, 5 June 2025

Chain of Command , Assualt on Fortiforcations May 1940

 That was a some introduction to Chain of Command  2. A German Pioneer assault on French fortifications in May 1940. The game was loosely based on Scenario 3: Point 247 from the Forgotten Battles : Battle for France, 1940 by Peter Heath. The Germans had just crossed the River Meuse and were to assault a series of fortifications.


Sadly in the set up I made bit of a pig’s ear of it. Not thinking I placed one of the objective markers in the town rather than on the hill. This resulted in a major advantage for the Germans. Due to a poor patrol phase the Germans advanced up the flank in to the village in the first round. Putting pressure on these poorly placed objectives markers from  the get go. Nevertheless, this provided me with an opportunity to salvage something for a bad situation, a position enjoy from a game perspective.


With an off table bunker buster smashing one of the fortifications in the second round. German Pioneers pouring into the town and swamping the French rifles posted as pickets at the edge of the village. Desperately, attempting to hold the line. As two further Sections deployed to protect this compromised flank as the final started in the third phase of counted down from eight. 


As the Germans brought their weight to bear the French Force Morale stated to tumble  When it reached t two the tattered remanence of the French Reserve platoon withdrew. leaving the field to the German. 


On reflection , it seems a plausible scenario for May 1940, an aggressive German Pioneers find a weak spot and flank a defensive position while the French scramble to plug the hole. I was struggling to focus on what was new, what was existing and  how it all goes together. There is a lot there once it gets on to the tabletop. 


I am very much looking forward to getting more games under my belt and becoming more confident with the raft of changes. 


Tuesday, 27 May 2025

Indian Army Platoon 1941/42 for Chain of Command.

When I approach a new project platoons then to be painted section by section and are interspersed with other projects to keep them interesting and not making projects become tedious slog of painting large numbers of similarly outfitted miniatures. Although painting projects to tend to drag on a bit with this approach of swapping between projects. It does allow a flexibility to work on what appeals to me at any one time. 


This weekend the Indian Army Platoon is reaching completion the three section are made up from AB Miniatures supplemented with Stonewall ANZACS. This combination gave a great mix of head gear and poses along with uniform options. 


The main reference for painting them was Army Uniforms of World War 2 by Andrew Mollo with Malcolm McGregor’s fabulous illustrations. My Grandfather gave me this book for my 11th Birthday in 1980 and I still refer to it regularly today. 


The other helpful source of reference was  from Steven’s Balagan Blog: Spanish and Portuguese Military History, Wargaming and Other Stuff.  Where there is a most useful painting guide for the 14th Army, British and Commonwealth Troops in Burma.  


As is often the case with these projects, support options will be added and alternative figures may be painted to represent leaders or differently configured sections for later periods. In the meantime BEF figures clad in Khaki Drill Battledress will make up the numbers in extra support. 


Sunday, 25 May 2025

The Lard Zone : Salute 52

In recent years the Lard Zone has been a regular feature at Salute, showcasing the best of Lardy games and giving attendees the opportunity to participate and try out games. Salute 52 was no different.

With the release of Chain of Command 2 and the future Arnhem Campaign Handbook in the offing Nick and Rich took the opportunity to put on a Market Garden game with with British paratroops taking on the various hodge-podge of kampf gruppen that assembled to oppose the landing. One of the striking things about this game was the topography of the table, (which I failed to captured with my photographs). Nevertheless, having a railway embankment and a station  the table sloped  down to a resdental area,  beautifully representing the terrain in there area where the battle took place.


One of the outstanding games on display was Joe Bilton’s What a Tanker, in Caen 1944, which saw a mass ranks of tanks Clash in the ruins of the Norman city. I impressed myself by taking quite a few pictures of this game which hardly feature a tank! But there is so much to enjoy in Joe's absolutely sublime terrain which captures Caen in the days following  the D-Day invasion.


Additionally, the Lard Zone featured games of General the Armee, and Strength And Honour , sadly the photos I snapped where too shaky to use here.

Friday, 16 June 2017

Malaya 1942 Campaign Game One - Patrol

Well, after the first campaign game and its one nil to Dave's Australians. So fair dinkum cobber. 
More haste and less speed is the lesson I will take from this encounter. 


This post will basically consist of a list of the mistakes I made. The end result  was basically engineering my own defeat from a relatively strong position.

Lesson One 

Just because I have tank does not mean I should deploy it at the earliest opportunity

When to do so would put it directly in the cross hairs of a the only Australian unit capable of destroying it. I didn't exactly make it difficult for the Australian 2 Pounder by placing the lump of metal where they want it. 

One upside of this was it provided me the opportunity to use my new smoke and flame marker, recently, liberated from my wife's craft box. I suspect the destruction of this tank was a touch of karma. At the beginning of the game when I rolled my support dice I  had not rolled high enough to get a tank. We decided to re-roll it so allowing me to choose a tank from the support list. 


The first couple of rounds things were going quite well on the right. My squad advanced on the tentatively and  made contact with the Australian section lurking in the jungle. By combining direct fire with my mortar team I was successful in pushing them back.  So far so good. Alls going to plan. 


Lesson Two 

Better situational awareness when advancing units 

This is where  it all when wrong. Over on the left of the I pushed forward with the second squad. I rolled long. This brought me within four inches of the Australian section and there by initiated the close combat sequence. Which basically desimated both sections. But because the  the Australians are tough they don't take any shock while the remained of my Japanese withdrew due to a ton of shock. 

The veritable movement generated by dice roles are something I really like about Chain of Command. On this instance I rolled myself into trouble with a high roll. But it beautifully replicates a unit wondering around the Jungle a stumbling into a into a enemy unit.  


Lesson Three

Remember the sequence in which to activate units (This should have been learned by now)

The was compounded by the mistake I made in the last game by not ordering my mortars to fire ahead of advancing my infantry. My ability no to pay attention to the lesson of the past possibly makes me suitable for high office. 

Lesson Four

Hold a lead back in reserve to deploy the reserve 

My next mistake was to deploy my junior leader prior to getting my  reserve squad on to the table. Hence, this meant that the reserve did not make it onto the table. 

All this mayhem resulted in my command dice dropped to two dice. This basically paralysed my ability to  move. This was compounded by the factor my senior leader was caught on the wrong side of the road. 

Lesson Five 

Try not to be stupid

To react to the Australians reinforcing on the right. It was necessary to move my senior across the road to get the attack moving forward again. As he moved from cover onto the road an Australian Bren team took the opportunity to use a Chain of Command dice to interrupt his movement with a hail of bullets killing the senior leader. This reduced my command dice to zero there by forcing the Japanese to withdraw. 


The first game went to the Australians. Well done Dave! 

Monday, 22 May 2017

Chain of Command - Malaya 1942


Finally I got my Japanese finished and on the table.  This was the warm up game before Dave and I undertake the Too Fat Lardies Malaya 1942 campaign. We felt we made some interpretive mistakes in the Patrol and Deployment phases of the game we decide to use it has a learning game.


My placement of the Jumping off points were in the jungle when they should have been on the road according to the Campaign notes. But that aside I got a my tank on to the table early.  This was met with an Australian 2 Pounder Anti-Tank gun. For the next couple of rounds it exchanged fire with my Type 95 Ha-Go resulting in a disabled tank and a routed gun crew.


Since the lumbering beasts had been dealt with we started to deploy our infantry sections. I deployed mine incorrectly in the jungle where I should have placed them on the road.  Nevertheless, I advanced two sections through the bush while the flanking section had a Mexican standoff with a squad of Australians on the other side of the road.


What followed for me was a lesson in close combat I advanced a unit of infantry with in four inches of an Australian section resulting in a close assault. The entire unit was killed (twice). It was a really good reminder to at the very least rock a unit back with shock at the very least, and ideally pin the before closing to engage them with close combat,  particularly if they are Australians.


One central error in this phase of play was activating my dice in the wrong  order. My senior leader started issuing orders before The junior leader attracted to the light mortar selection. As a rule of thumb i should work from the rear forward when activating command dice. 


 Following that hammering it was necessary to regain some honour and turn things around. This time I got the activation order correct firing the mortar sections first and the having. The senior leader orders one of the remaining units to fire on their Australian counterparts.


Because the Japanese squads are larger plus the support of a mortar combined with rolling lots of sixes I made short work of two Australian Squads on the right. This was made somewhat easier by the face my command dice gave me three phases on the bounce. Followed by a further two consecutive phases of play. The game ended with  Dave curing my  jammieness.